• Home
  • Tutorials
    • MyMemories Tutorials >
      • Beginners >
        • Getting Started in My Memories
        • My Memories - Overview
        • Using MyMemories Templates
        • Using Outside Content in My Memories
        • Using a Photo as a Background
        • Quickpages >
          • Quickpages Introduction
          • Quickpages 1
          • Quickpages 2
          • Quickpages 3
          • Quickpages 4
        • Vellum Mat
      • Intermediate >
        • Making a Photo Template from an Outside Template
        • Using an Outside Template as a Sketch
        • Two Step Photo Block Pages
        • Circles on Rectangles
        • Making Sun Ray Shapes in MyMemories
        • Sun Ray Shapes 2
        • Totally Tropical Page
        • MyMemories Grouping Photos
        • Creating a Torn Background in My Memories
        • Making a Plaid Background in My Memories
      • Video and PDF Tutorials
    • Memory Mixer Tutorials >
      • Memory Mixer Quickpages 1
      • Using Outside Content In Memory Mixer
      • See Through Embellishments in Memory Mixer
      • Using Outside Template in Memory Mixer
      • Memory Mixer Speciality Fonts
      • Angled Photo Blocks in Memory Mixer
      • Adding MMS Templates to Memory Mixer
      • Photo Outlines 1
    • Advanced - Memory Mixer and MMS >
      • Rounded Corners on a Block of Photos
      • Making a Shadowbox in MMS
      • One Straight Corner, Three Rounded Corners
      • Photo Block In A Circle
      • Making A Pie
      • Making Cut Out Shapes in MMS
    • Design Ideas >
      • Long Tall Photos
      • Multiple frames with one photo
      • Repeated Photos
      • Page-Within-A-Page
      • 10 Photos Template
      • Clustered Borders
      • Reduced Opacity Backgrounds
      • Misplaced Frames
      • Really Big Titles
      • Lots of Squares
      • Same Photo Different Effects
      • Make Your Own Stacked Papers
      • Journal Cards
    • Photoshop Elements Tutorials >
      • Using Masks in PSE 11
      • Using Templates in PSE 11
      • Adding drop shadows in PSE 11
    • Paint Shop Pro Tutorials >
      • Using Masks in PSP X4
      • Extractions in Paint Shop Pro
    • Picmonkey Tutorials >
      • Saving Images in Picmonkey
      • Resizing Layouts for Tablet, Smart Phone etc
      • Separating Alpha Sheets
      • Recolouring PNGs in Picmonkey
      • Adjusting a background in Picmonkey
    • General Tutorials >
      • Adding a QR Code to your page
      • Making Peekaboo Cutouts With My Memories Shapes
  • Articles
    • General Scrapbooking >
      • Travel Scrapbooks >
        • Travel: Planning The Trip
        • Travel - Title Pages
        • Travel - No Photos
        • Scrapping On Your Phone
      • Memory Mixer or My Memories
      • Organising Your Stash
      • Building Your Stash With Freebies
      • Easy Peasy Facebook covers
      • English Lessons 1
      • Bad Photos
  • Software
    • Software Overview
    • MyMemories
    • Memory MIxer
    • Picmonkey
  • Pocket Scrapbooking
  • Albums
    • Cruises
    • Other Travel
    • Beaches
    • Day Trips
    • Smilebox Albums >
      • Cruises and Travel
      • Beaches and Day Trips
      • Home, Garden, Pets
      • Family
  • About Us
  • Links
  • Blog
Coastal  Scrapbooks

Sun Ray Shape Part 2

Here's another sun design you can make in My Memories or Memory Mixer. The pictures below show a My Memories screen, the functions will be on the other side in Memory Mixer.

This template was kindly provided by Little Kiss Creations on their Facebook page (April 2013) but you can use any similar template or sketch  if you already have one.

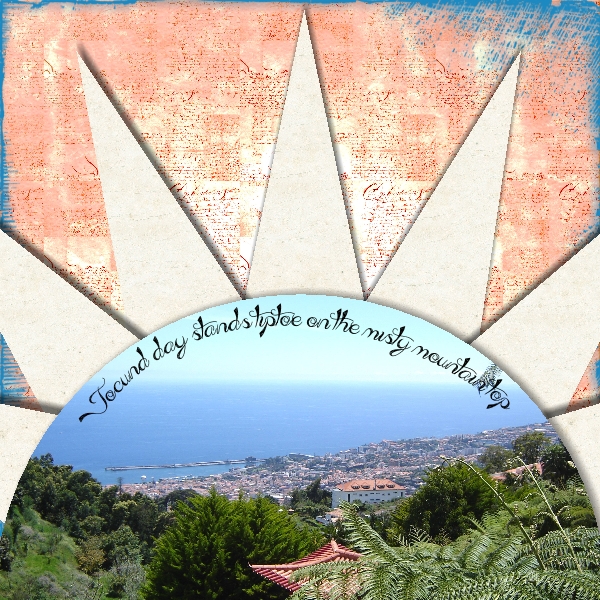
Here's the page I made. I used CatDesignz' Coral Summer papers for the sun rays and background. The overlay is from the Totally Tropical kit.
Picture
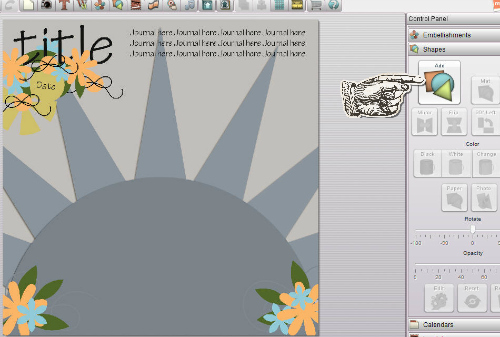
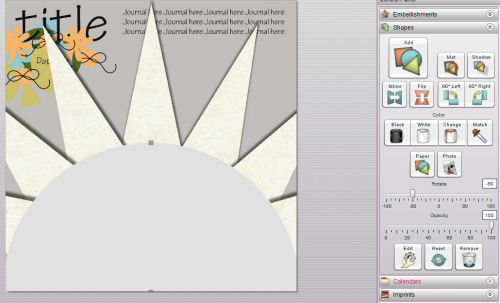
Add the template image as a background and choose a shape:

Picture
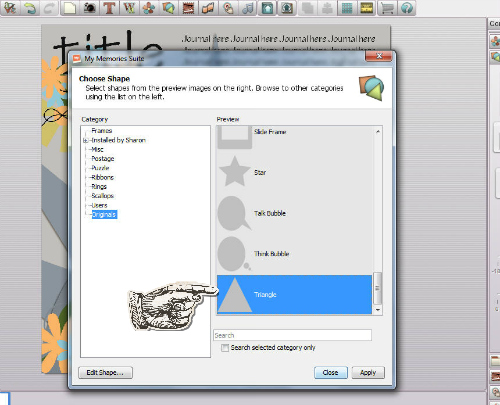
You need this triangle, not the right angle triangle:


Picture
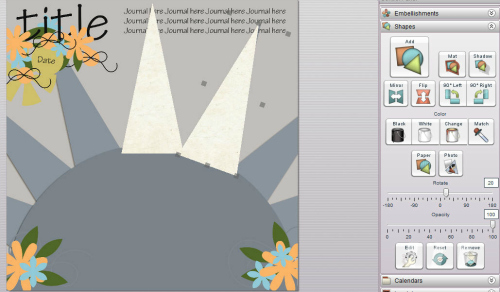
Push/pull the grey squares around the triangle so it's the right shape and place it over the first sun ray. Now add a photo/paper to it, Right click and copy the shape so that each ray is covered. This way you won't have to keep going through all your folders to find the paper again. If you intend to put a different paper in each shape you can right  click and copy at the plain shape stage.
Picture
Once you have all the rays in place add a semi circle shape. This available free from Albums to Remember, click HERE to see how to add shapes to MyMemories. Or you can use a circle and move it so only half shows on the page. Add your photo or other paper and any title and embellishments.Remember to change your background too! I deliberately used a misty background to go with my favourite Shakespeare quote (from Romeo and Juliet).
Picture

Show us what you made!

We have an album for your layouts on the Digi Scrapping Divas group HERE. You can also shout if you need any help!

Did you miss Part 1?

The first sun ray tutorial is HERE.

free counters
(c) Sharon Horswill and Coastal Scrapbooks. All Rights Reserved.