
Organising Your Stash
One thing non-scrappers ask me about scrapbooking is, "Where do you get all this stuff?". Well, all this "stuff" is downloaded from the internet and it then sits on my computer. Within weeks - or even days - of starting digital scrapbooking you will end up with tons of "stuff" on your computer and it can be overwhelming if you don't organise it properly. It can be a disaster if you buy lots of kits and can then never find the ones you want so you can't use them. That's just wasting your money. I suffered this in my quilting hobby so I had to learn it twice!
You don't need any special software or classes (it's amazing how people can find ways to make money out of any hobby ...). You only need to be able to find your way around Windows Explorer or MAC equivalent. If you don't then force yourself to ask your wife, husband, children or next door's six year old to help you out.
Forget software like ACDSee. Any program that finds 200 blue ribbons for you is not going to be a substitute for YOU learning what kits you have and in the time you spend tagging everything and trying to get non-existent support when it crashes you could be organising your stash properly yourself.
Do it YOUR way!
There are as many ways to organise your scrapbooking supplies as there are scrapbookers. You will need to find a method that suits you otherwise you will still not be able to find anything.
How do you download kits?
[Tutorial to follow on downloading and unzipping for those who aren't familiar with this]
Tidy Up!
When I unzip my kits I send them from my Downloads folder to one called Digital Downloads where I tidy them up.
When you buy kits they will often come with a ton of junk- blinkies, previews of other bits of the kit the designer hopes you will buy, links to their store, their blog, their Facebook page, their dog's photo album .... junk. Do NOT waste valuable space on your computer storing advertising messages like this. You paid for the kit (or you paid for the free kit by giving their website your attention), the deal is done, they do not get free advertising all over your computer. Does your underwear drawer contain flyers for the store where you bought the underwear? No, of course it doesn't!
I also delete the cheeky "do not pirate" notice. Since I don't intend to be a pirate and have thousands of kits I don't need thousands of that jpeg. In no other industry is the paying customer assumed to be a thief!
Some kits arrive in a complete mess with everything just dumped in your download folder. You will learn to avoid designers who waste your time like that.
All you need to keep is:
1) One copy of the terms and conditions and the credits if the designer has used someone else's work (there will be a document called "credits")
2) Sub-folders for elements, papers, borders, stacked papers etc. if it's a small kit I often leave it all in one folder. If it's a very big kit I might create more folders for word art, clusters etc
3) A Windows folder image. See below.
The Windows Folder Image
This is a specific meaning of the word folder. Find the preview image provided in the kit and rename it folder. Exactly like that. Not "kit folder" or "folder image" or "folder 2" or any misspelt variation and WITHOUT the " ". There might be one in the kit already. This is because Windows Explorer uses folders to see what's in the kits.
NOTE: The image must be a jpeg, not a png or some other file. Usually if you right click on an image as "save as" it will save to your computer as a jpeg or you can screenshot it on your phone. If you do this make sure the camera settings on your phone are set to most compatible otherwilse it will save your photos in the ridicuous good-for-nothing heic fornat.
It's easier to show you how this works with a picture. I clicked on my Beach Tropical Bright category and told Windows Explorer to display "Extra Large Icons" and this is what it shows. Obviously I'd have to scroll down to see all of them!

Even if you know exactly where all your kits are this can be useful for inspiration about which kit to use.
Rename Where Necessary
If you look at the list of tropical beach kits above you'll see they have a shortened version of the designer's name at the beginning. Kits tend to come like this. My Memories kits don't so you might want to rename them with the designer name at the beginning.To rename a folder in Windows right click on it and choose the rename option.
My protocol is:
Designername_KitName or where there is a collaboration between designers it will be Designer1-Designer2_KitName. I don't usually indicate if the kit was a freebie although you will see some of those above.
There is a reason you need the designer name at the beginning as you will see below.
How to Organise Your Folders
OK, so you have each kit neatly tidied up with its Terms of Use and the folder image. (To create a sub- folder within a windows folder right click on it and select New Folder). Now where do you put them?
I store everything twice. Once under the designer name and once under the theme of the kit. Since I've been digi scrapping for years I have thousands of kits and have two 2TB external hard drives (EHD) attached to the computer. Really. I've been doing this since digi scrapping was invented! They are backed up onto additional EHDs at regular intervals and stored in several places Don't worry, if you just got started you probably won't need extra storage but you might want to get some EHDs for back up purposes.
My Designers EHD simply has a folder for each designer where I have three of more of their kits and a MISC designers for those who don't have a folder of their own. In Windows you just drag the folder to where you want it on the EHD.
The "Themes" folders are more complicated. Here's a picture of the top half of my "Scrapbooking" folder on an EHD.
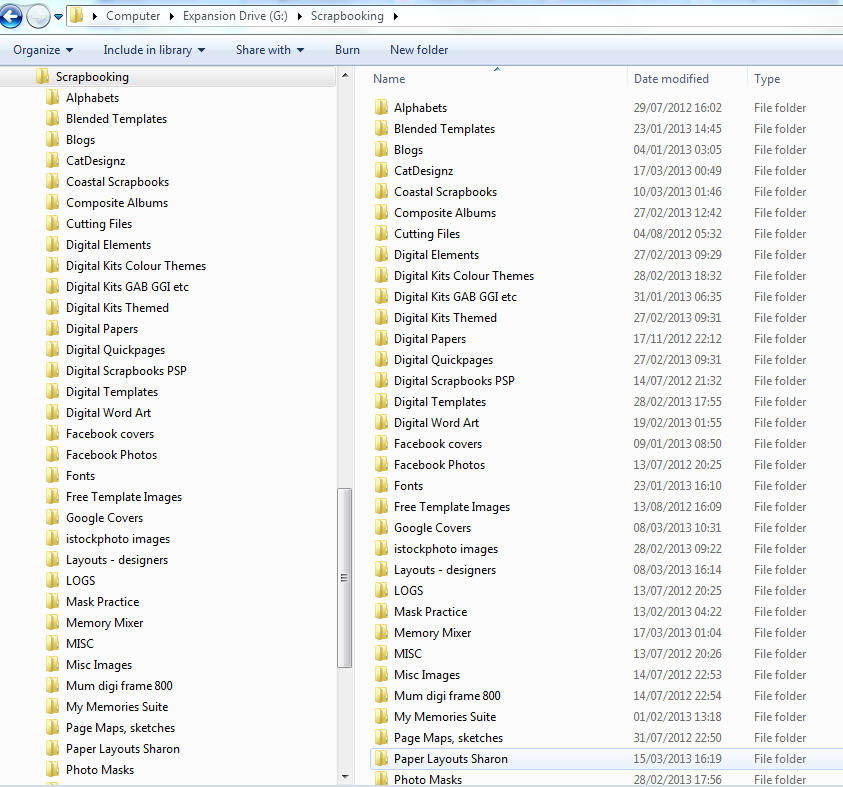
As, you can see there is rather more than "themes" in there! Alphabets are alpha sets I've bought separately. If they come with a kit they stay in a kit or occasionally get copied to the Alphabets section if I think they'll be really useful. "Digital Elements" is full of frames, edges, overlays, stitches, bling etc, again when bought separately.
Some kits don't really lend themselves to a subject theme so they go into a colour theme instead. I also like to keep kits I've bought in a Gotta Grab It, Grab-A-Byte, Pickle Barrel type deal together. Let's look at some of the themes:
Some kits don't really lend themselves to a subject theme so they go into a colour theme instead. I also like to keep kits I've bought in a Gotta Grab It, Grab-A-Byte, Pickle Barrel type deal together. Let's look at some of the themes:
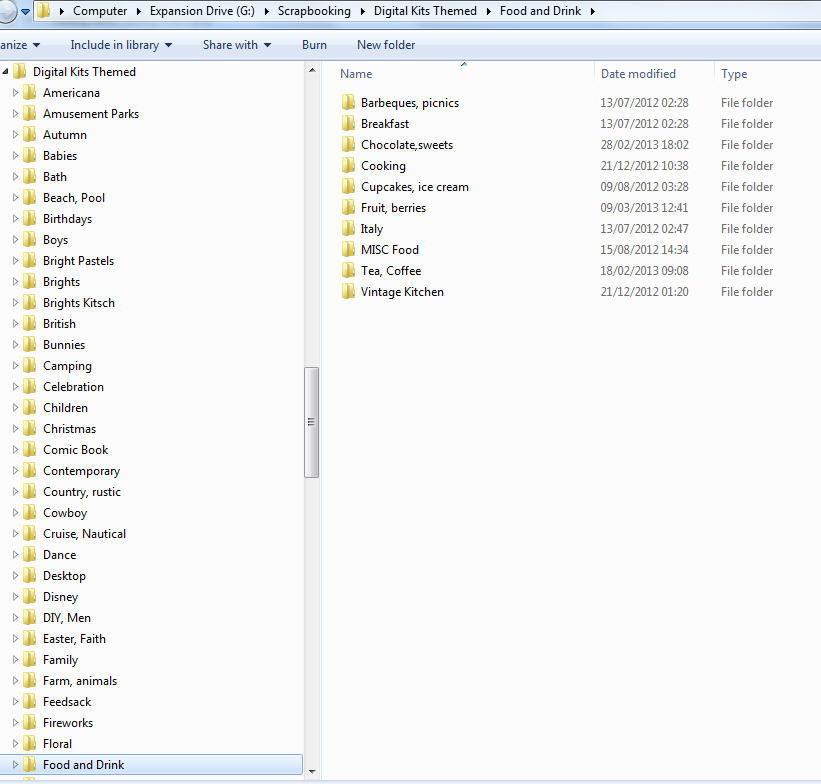
We only got to F in this picture and I clicked on the Food and Drink one who show you (on the right hand side of the picture) that it has sub-folders.
The way you categorise your theme folders will depend on what you like scrapping and what kind of kits you collect. We NEVER go camping but I have photos of other people crazy enough to do so. "Feedsack" has a meaning to me because I'm a quilter (it's 1930s/40s vintage style), You will soon develop your own system.
The way you categorise your theme folders will depend on what you like scrapping and what kind of kits you collect. We NEVER go camping but I have photos of other people crazy enough to do so. "Feedsack" has a meaning to me because I'm a quilter (it's 1930s/40s vintage style), You will soon develop your own system.
Quickpages
I love quickpages (and the anti-quickpage snobbery makes me laugh). We have several tutorials on how to use them on this site. I have a separate Quickpage section and it's organised in exactly the same way as the main kits (unless I don't have any quickpages for that category), for example there is a Christmas folder and a QP Christmas folder. Where a kit contains quickpages I rename the quickpages as follows:
designer_kitnameQPsK
and make sure that folder includes a folder image and a copy of the TOUs. This is because I leave the QPS in the kit AND put a copy of the ....QPsK folder into the Quickpages section. If I see it in there and use it the K on the end tells me there is also a kit. If there are more than four pages I'll add the number so the name will end in say .....QPs8K. This helps me if I need to make an album quickly.
Project Life Kits
I keep separate folders of Project Life type kits so they're easy to find (some will be duplicated in my general kits). I like to be able to find photo overlays, word art etc but I also store designer PL kits together. Here's a picture of my Project Life folder:

Fine Tuning ...
Every now and then it's worth going through all your folders. You will notice when things are in the wrong place. you will rediscover kits you'd forgotten about and you can then use them, you will discover kits you hate. Delete those - even if you paid for them.
Back Up Protocol
When kits have been tidied up and are ready to be put into their categories this is what I do:
1) Put a copy in the Designer folder on EHD1
2) Put a copy in the theme or other category folder in EHD2
(Just drag them to where you want them in Windows explorer - if it's to a different drive it will automatically copy them, not move them)
3) Move them to another folder in the C drive (on the main computer) called, for example, Kits Filed March 2021. There is one for each month. After one of my regular back ups the folder is renamed to Kits Backed Up March 2021. This means I can delete it if I want to. The kits are already in their designer and theme folders AND have been backed up. I keep these monthly folders on the C drive so I can quickly look for a kit I knew I bought last week. It's also a good discipline to go through these monthly folders and realise I haven't used the kits at all and I'm therefore buying too many! After a while these monthly folders are deleted to save space.
Confused?
We show you how to do this "in real time" in one of our cruise classes or if you see me anywhere with a laptop you can stop me and ask me ;-)